Aunt Zhang did not write much post-photography articles, and the landlord who travelled as a photography dog ​​for a long time did not pay attention to the work, and desperately sent a variety of audio headset fever posts, did not write any articles related to photography, so today intends to return to the present Once on the line, simply write something, hopefully a little help for beginners. The landlord has something to write about, or does not say. If you want to say something, you like to talk about the problem because the most troublesome thing in the world is a little knowledge. Many times, a little knowledge not only cannot master a method, but also it is easy to mislead by spreading. Others, so it might as well not know. So this article will add some principled things, so that you can infer anything from the contrary, and truly understand the truth, rather than a lot of so-called tutorials are completely hands-on process, leaving no specific scene is completely meaningless.
General comment: Do you want to do late?The answer is of course: Yes! Or why am I writing this article?
However, in addition to this word, I still write a little nonsense to emphasize the principles and importance of the later period.
As the saying goes, there is no power in the early stage and no activity in the later period. This is not exactly true. The correct part is that the later period is definitely based on the basis of the previous period. Therefore, the relatively good photos in the early period will provide a better foundation for the later period, allowing greater room for the later period. If there is a mess in the early days, there is really not much potential to be tapped in the later period. What's wrong with this is that many post-production techniques are used to solve the problem of "not giving up" in the previous period. If the previous period is really perfect, then there is no need to do it later. After all, many of the factors in the previous period are uncontrollable, such as weather, time, luck, and so on. In today's booming digital imaging technology, the latter part can indeed become a waste to a certain extent, turning a photo that didn't look good in the early stages into a beautiful one. such as:
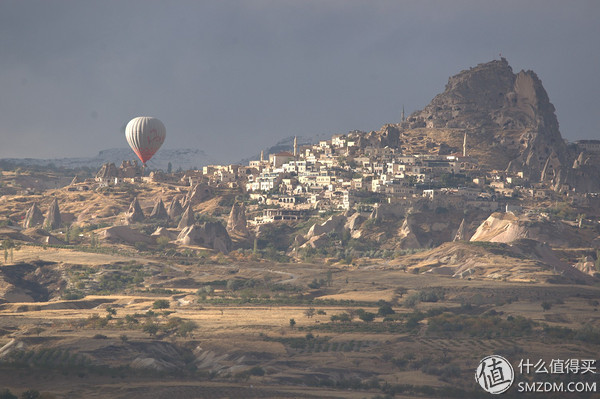

(Photographed in Cappadocia, Turkey)
In general, especially for travel photos, the situation of early non-availability is nothing but the following:
1, composition
This is mainly a horizontal problem. There is not much room for the later period. Apart from cutting, there is no other way. So I don't talk about this in this article.
2, focus
This is mainly a camera's performance problem, but also a part of the level problem. This later period is also relatively small. Although the latest version of Photoshop already has a filter that can be used to patch photos that are out of focus, the effect is not great, at least not for all photos. In addition, in fact, there is rarely a situation in which the scenery piece is out of focus, because normally it is a small aperture + distant focus. If this can still be run, then I have nothing to say. The characters and the like, once they are obviously out of focus, will not work. So I don't talk about this.
3, exposure
This has camera performance issues, horizontal issues, and objective issues. For scenes with large dynamic range, the camera cannot take care of the brightness of the entire screen. This is normal. Of course, poor overall exposure due to improper metering is also a situation, which is a matter of level. For the errors in the exposure, there is some room for remediation in the later period, but the premise is that you use RAW format to shoot. If it is a JPG, there is little room for remedy, especially for over-explosion, there is almost no way. This will be discussed later.
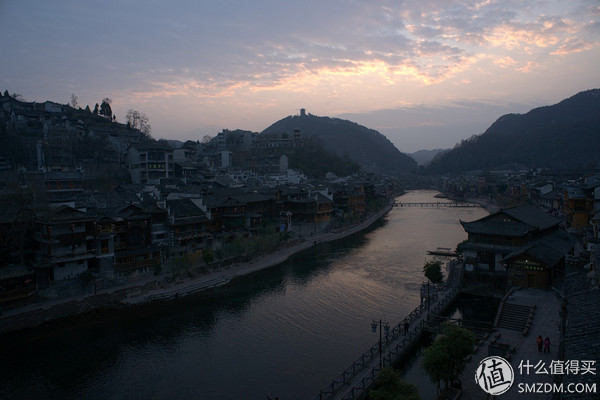
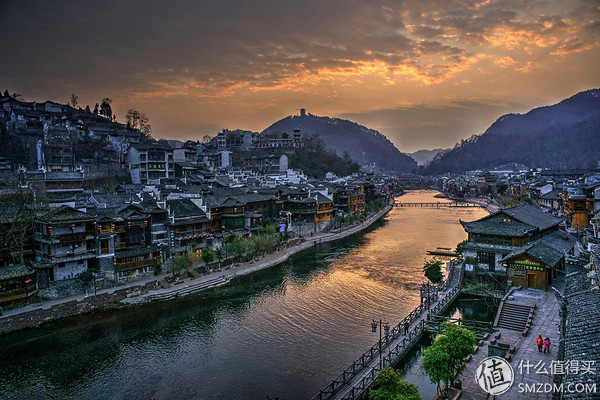
(Photographed in Hunan Phoenix)
4, color
This is mostly an objective problem or a camera's performance problem. This problem is the most common in travel photos, such as various colors, inaccessible colors, grayish colors, color casts, uncomfortable looking, and so on. This piece of color is the best value for the later period. It can be said that most of the film's later period, in addition to correcting exposure errors, is basically adjusting the color. The color tone is good or bad, directly affecting the value of the final film. So I'll focus on this one.

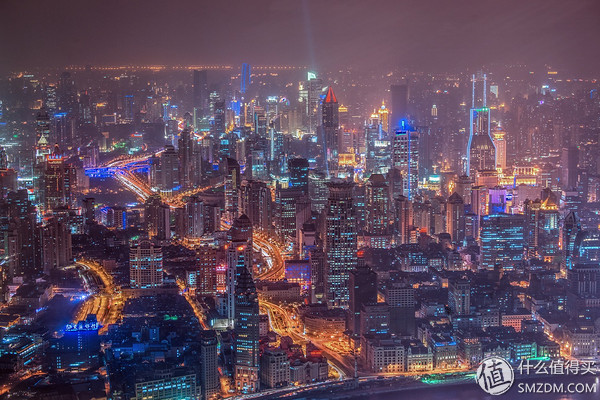
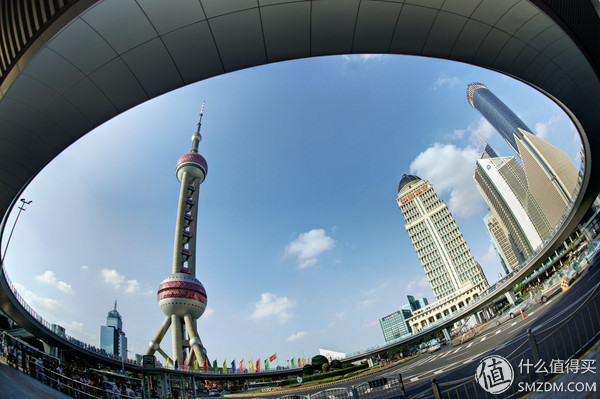
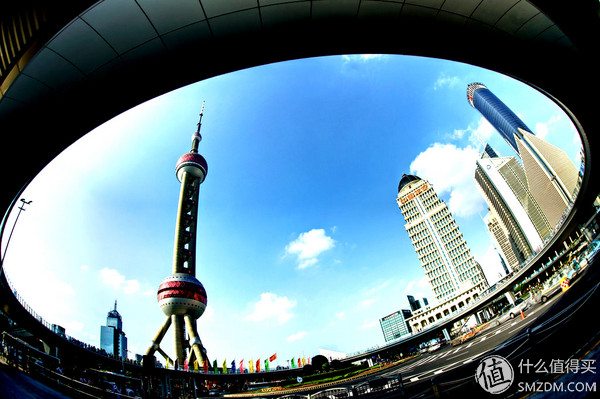
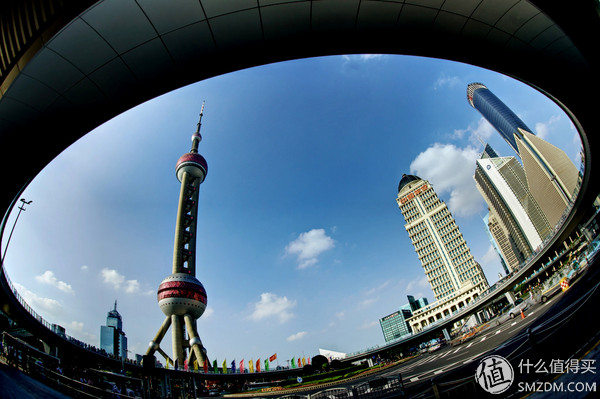
(Photographed at the Shanghai World Financial Center Tourist Level)
Therefore, in general, for a considerable part of the early period, there is still a play in the later period, and the number of plays depends on your later level. It is no exaggeration to say that the late stage of the digital era is as important as the previous stage. Pressing the shutter button has only completed half of the photos. After the completion of the period, the photos are actually completed. What's more, there is a benefit in the later period. When your level continues to increase, you can take out the photos you have taken and repeat it again and again. You may have new experiences and new effects each time. This is totally impossible for the early period. Therefore, the latter period can also be said to be secondary creation. Many landlords have found out from the rubbish piles many years ago to re-do it later. They could have done so beautifully.
Of course, I know there are a lot of people who are opposed to being late or lazy. The main theory is that the photographs should be taken when they were photographed. In the later period, the photographs will be faked. It cannot be considered at all. Some people also believe that digital photography is a kind of impetuous performance, and returning to film is the real thing. For this fallacy and heresies, I must scoff at it.
First of all, do not think that there will be no later period in the film era. There will be a large number of articles in the development and fixing stages. If you look at the film of Lang Jingshan, you know that the film can still be played later. Only the film's late threshold is too high. Most people have no conditions to darken the house, so they can't afford it.
Second, the digital camera uses a JPG file. Doesn't it use software to adjust what you think is real? In fact, the camera's internal image processor has already processed the original image information. A digital camera is itself a small computer, but the software inside is customized by the manufacturer and cannot be adjusted manually. Rather than handing over the processing to the camera's program rather than doing it yourself on the computer, it's true that it's just a name. It's just deceitful.
Therefore, the later period is a glorious and valuable work. Any photographer who pursues it should take it seriously.
Finally, there are three important things to say:
Must use RAW format! Must use RAW format! Must use RAW format!
Preparation: Common tools for post processing Simply talk about this part.
Photo post-processing procedures are too many, but basically can be divided into several types:
1, Raw processing software
These softwares are mainly used to process Raw format files taken by the camera, and can be adjusted in various aspects such as exposure, color and details, and finally output as a common format, such as JPEG or TIFF. In addition to the software specially designed by the camera manufacturers for their own cameras, there are many third-party tools. The most common ones are Adobe Lightroom, Capture One (Pro), Silky Pix, DxO Labs, Raw Therapee and others. These softwares have their own merits in terms of functionality, but without exception, they are very powerful. They can make various adjustments and settings to Raw files and output high-quality images.
Another distinctive feature of raw processing software is workflow support. Generally, these softwares can process the file queue, allowing you to adjust the back image while it is processing the previously adjusted image, which can make full use of time and improve efficiency.
My personal most common Raw processing tool is Raw Therpee. There may not be many people who use this software, and the visibility is much lower than commercial software such as Lightroom. But it is a free software, based on the GPL distribution, and has cross-platform features. It is available under Windows, MacOS, and Linux, and is completely free. Functionally speaking, it is almost the strongest of the Raw processing software I've ever used, and the setting options are much more perverted (common features of free software under Linux), and many settings even I can't understand. In particular, the noise reduction function of this software is very characteristic. In addition to the common black and white and color noise suppression functions, there are also filters for red, blue and yellow-green noise and electromagnetic interference (very coarse noise). Many other Raw software and Photoshop (including Noise Ninja plug-ins) can't eliminate the noise here. Another advantage of this software is its ability to handle JPG files, unlike most Raw handlers that can only handle Raw files.
The drawback of Raw Therapee is that the interface is a bit too complicated, and sometimes it is not stable, it will flash back (another common problem of cross-platform free software), 64-bit late version of the problem improved a lot.

2. Comprehensive processing software
Of course, this is represented by Adobe Photoshop, and it seems that there is no other similarly famous software other than Photoshop.
The features of Photoshop are big and complete, and basically you can think of unexpected features. I think a photographer may not use 30 percent of Photoshop's functionality for a lifetime. Of course, the price for big and complete is particularly complicated. Its various filters and processing options can match each other to get what kind of effect, I am afraid even software designers themselves are incomplete. It's no wonder that books like Photoshop's application skills can also be published. But the landlord never looked at these things. All the methods were explored by him...
The latest version is Photoshop Creative Cloud 2015, adding a lot of useful features, including automatic repair of stains and so on.

The Creative Cloud version is now available for subscription, and you can always upgrade to the latest version for an annual fee. This is a photographer's version of the package used by the landlord, each month, 89 Hong Kong dollars, including Photoshop, Lightroom and My Portfolio website (a photographer's personal home page of the site) the right to use, feel the price is still very high.
In terms of free software, the GIMP is the most famous, but there is still a clear gap between the function and Photoshop, which is roughly equivalent to the version of Photoshop in 178 or 78 years ago, but it can be regarded as a substitute for excluding money.
The functions of colors, filters, and layers are basically sufficient for photo processing. The noise reduction function is relatively weak, but it also supports external plug-ins, and the noise reduction is generally done in Raw processing software, so basically it does not have any effect. Plus the installation package is relatively small (less than 100 MB), does not need to spend money or crack, in general, is a good stuff.
3, special processing software
Just said that Photoshop is big and complete. Although it is very powerful, it is not as perfect as it can be in certain specific areas. These special processing software are aimed at these weak points of Photoshop for drilling camps. You have eaten a table of meat, and you have to give some soup to drink.
These dedicated software and travel photography related tools are mainly used for HDR and widgets. When it comes to HDR, the best known is Photomatix Pro, which evolved to the 5.x version, with more powerful features and more configuration options. The effect is basically at the top level in all HDR software and can cope with most scenarios.
In addition to Photomatix Pro, another software I use is called HDR Projects. This is a $29 discount (original price $199). Relatively small, the effect is not as good as Photomatix Pro in most cases, but on some photos. The effect is better, so basically as complementary.

The last software is Kolor Autopano Giga. This is a piece of software, the effect is much better than the Photoshop's feature, and the speed is fast. However, in this article I did not intend to talk about the film (in fact, there is nothing to talk about), so it has been passed.

In addition to the above, a handy tool is recommended: Faststone Image Viewer.
This is a free software, mainly for the use of the map, but there is a set of easy-to-use image processing tools, including common exposure, color, crop, angle adjustment, size adjustment, etc., also supports screenshots and drawing boards ( Label the image with ), as well as batch processing and format conversion. In addition, most common RAW format files are supported. The human-machine interface is also very simple and easy to use. The most valuable is that the installation package is only about 5MB, and also supports the installation-free mobile usage (you can carry it in the U disk). Compared with the popular ACDSee, the functions are basically the same, the operation interface is more efficient, and the operation speed and the weight are better. If you are away from home and travel to the hotel every day to tidy up the photos taken, after doing a simple treatment and send microblogging or a circle of friends, this gadget is simply the best choice.

After the brief introduction of the tool, I ended by saying that although most people are not professional photographers, they still support genuine products if they can.
In addition, for best picture quality, it is recommended to adjust as much as possible in Raw processing software. If a process can be done both in Raw software and later in the software like Photoshop (for example, adjusting exposure or color temperature), then it should be done in the Raw software step, so that the quality of The impact is minimal.
Foundations in the Foundation: Adjustments for Brightness, Contrast, and Saturation Since it is the so-called shallow depth, I will start with the simplest.
The three things of brightness, contrast and saturation should all be known to the people of the earth, but there are still many subtleties in the middle.
In Photoshop and most image processing software, there are several tools that can adjust the brightness and contrast, of which at least:
Brightness/Contrast, Curves, Levels, some software, exposure adjustment tools (common in Raw processing software), and shadow/highlight adjustments (Shadows/Highlights) ).
What is the relationship between these tools? In short, they are essentially the same.
Then you have to ask, since the essence is the same, why do you need so many tools? This principle is also very simple, the so-called essence, refers to the fact that they are ultimately adjusting the brightness of each pixel in the entire photo, but in spite of this, due to different processing methods, there are still their own characteristics and applicability. This is like whether you are eating Yangzhou fried rice, Lanzhou noodles or white sugar, the essence is to provide the body with carbohydrates, but you can not let everyone eat sugar to live. Below is a brief comparison of their principles.
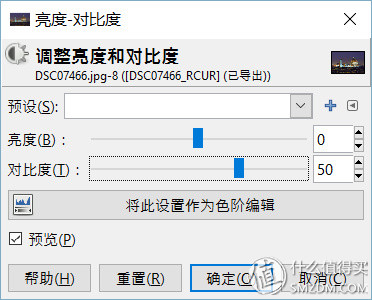
Brightness/contrast
This is the simplest and most intuitive tool, of course, the function is also the weakest, the old bird does not bother to use it.
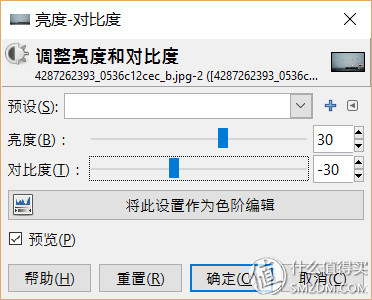
This function generally has two sliders, the upper one adjusts the brightness, and the lower one adjusts the contrast. Adjust the brightness, different software processing methods will not be the same, some simply add and subtract the brightness value of all pixels to a certain value, so that the entire screen is evenly lighter or darker, and some will put the value according to the adjustment The overall brightness of the screen is scaled. The latter method does not cause an overflow (the word is explained later), but it will change the overall contrast of the picture.
The adjustment of contrast is based on the brightness of the medium gray (in the common 8-bit grayscale image is the gray value of 127) as a benchmark, the brightness of the pixels above the reference all increase a certain degree of brightness, lower than the benchmark All pixels reduce a certain brightness. Note that the increase/decrease rate here is not a simple constant, but it is adjusted proportionally, that is, the farther the pixel's brightness is from the reference value, the larger the adjustment is, and this can be seen when the curve is said for a while.
Then you may find a problem, because the brightness value is limited, such as 8-bit grayscale image range is 0 ~ 255, if the brightness of the pixels in the adjustment process beyond this range how to do it? Very simple, the general practice is truncated. That is to say, if the brightness of a pixel becomes higher than the upper limit (white) in accordance with the adjustment algorithm, then it becomes pure white, and if it is lower than the lower limit (pure black), it will become Pure black. The scientific name of this phenomenon is called "Overflow". Therefore, the brightness/contrast tool is very simple and crude. Oversized adjustments often cause large areas of overflow. Here is an example. When the contrast of the original image is increased by 50, the effect becomes very ugly.
(Original)
(Effect of increasing the contrast after 50)
Therefore, unless the contrast of the original image is particularly low, or the brightness deviation is very large, try not to use this tool.
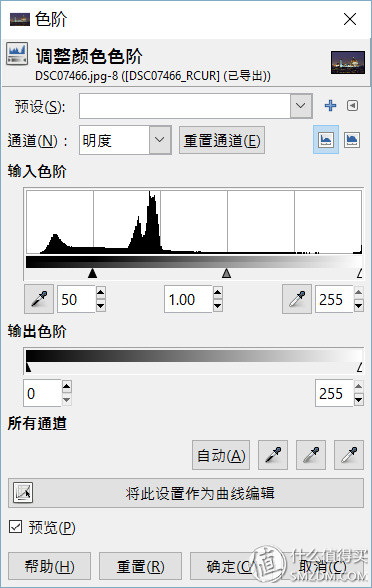
Levels
The Levels tool is equivalent to the enhanced version of the Brightness/Contrast tool. The interface looks like this:
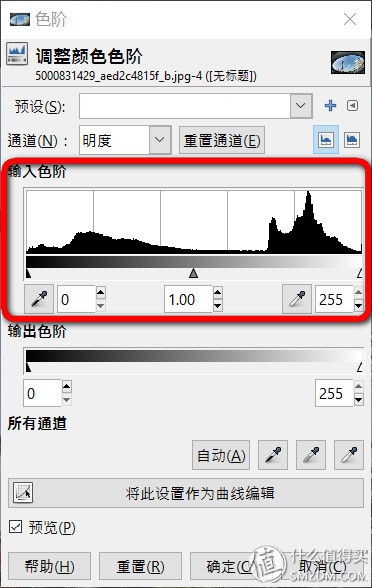
The above parameters seem to be a lot, but in fact, just look at the middle of the histogram and the three small sliders (red box) below it.
By the way, in the digital image, the histogram is a very important tool, and it must be able to read and understand its meaning. If you don't understand that you don't see the histogram, then you can't understand many concepts. If you really don't understand it, I'll just say a word or two here to make a brief statement. For more details, please search yourself online. The histogram represents the distribution of all the pixels in an image in each brightness. The histogram is a two-dimensional map. The abscissa corresponds to the entire range of brightness values ​​(0 to 255 for a common 8-bit brightness image). From left to right all white, this is always fixed. . The ordinate represents the number of pixels corresponding to each luminance value. This is a statistical value, regardless of the position of the pixel. The brighter the image, the more the histogram is to the left (because the bright pixels are more), and vice versa.
Back to the color gamut, the area inside the red box has a label "input level", and there is also a slider with an output gradation below the red box. The portion between the left and right sliders on the slider bar below the input color scale is the range of the input color ring, and the output color scale range is between the left and right sliders on the output color scale slider bar. The so-called input and output, you can simply understand the modified image and modified image. The color grading tool actually creates a mapping relationship between the two. Specifically, the luminance level within the input gradation range is uniformly stretched to the output gradation range.
For example, if your input level range is 50-255, that is, drag the left slider to 50, the right slider is unchanged, and the output level is 0-255, then the original image will be The brightness value of all pixels between 50 and 255 is stretched to the range of 0 to 255. The original brightness of 50 (or less than 50) becomes 0 (all black), and the original brightness is 255, and The brightness of all the pixels in the middle is proportionally adjusted accordingly, and the result is that the entire screen is darkened. However, unlike some software brightness adjustment tools, which shift all the pixels to dark equivalents, the tone adjustment is scaled because the brightest pixels are not greatly affected, and the overall image contrast outside the pixels overflows the pixels. Will increase.
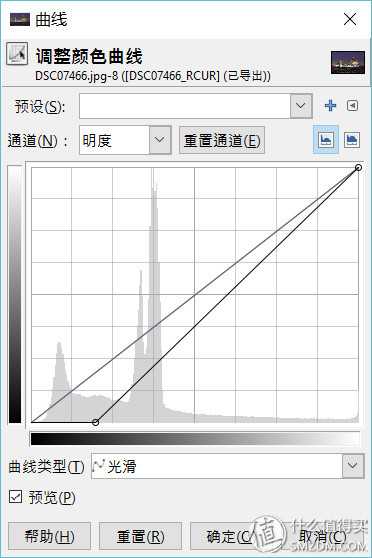
Conversely, if you move the right slider to the left, the picture will become brighter overall, and the darkest pixels will remain dark. If you move both ends to the middle, for example, the input color gradation is between 50 and 200, it is equivalent to stretching the brightness of the pixels whose original image brightness is within the range of 50-200 to 0-255. The intuitive effect is that the contrast increases. Of course, pixels whose original image brightness is less than 50 or 200 will overflow and become pure black and white. This is similar to the contrast adjustment tool, except that you are free to choose the stretching range, unlike the contrast adjustment tool, which can only stretch evenly on both sides of the middle gray scale.
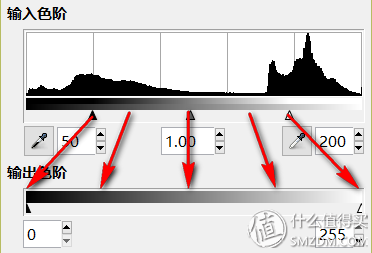
(color scale stretching diagram)
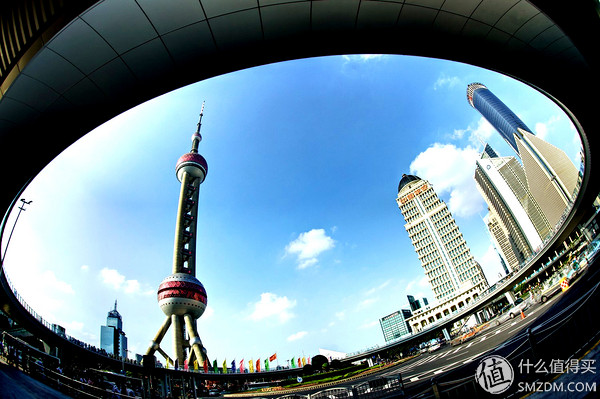
(The effect of the original image when the input color gradation is set to 50 to 200 is basically the same as the effect of the contrast increase of 50.)
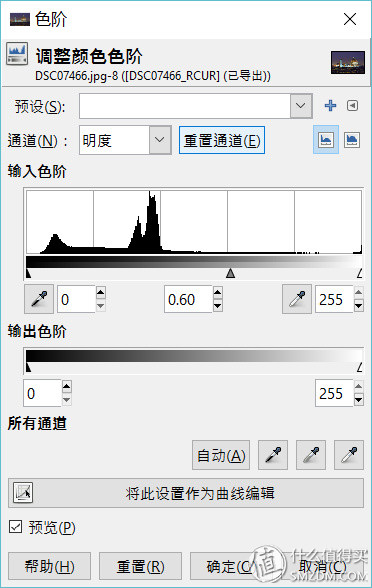
As for the output color scale range, this determines the entire brightness range of the adjusted image, and generally there is no need for adjustment. In this way, we have left one thing not mentioned, that is the slider in the middle of the input color scale. This slider is called Gamma and is the most important link in the level adjustment.
Gamma represents a non-linear mapping with a standard value of 1.0. What is a non-linear mapping? As we just said, adjusting the sliders on both sides can evenly stretch the input range to the output range (linear mapping). By adjusting the Gamma value, this mapping can be changed to Uneven. This concept is difficult to describe in terms of language. When it comes to the curve, it can be clearly expressed. From the effect point of view, when Gamma = 1, the original image does not change. When the gamma value is increased, the overall image becomes brighter, the gamma value is reduced, and the overall image is darkened, but the change of all the pixels is not uniform, but the pixel near the middle brightness. Larger changes, closer to the two ends (black and white), the smaller the change, the same at the end point, so there will be no overflow.
The following figure is from top to bottom: the original image, range input range of 50 to 255 (Gamma = 1), the range of the input range 0~255 (Gamma = 0.6).

It can be seen that adjusting the gamma value can better preserve the detail of the highlights and shadows while increasing the contrast compared to simply adjusting the input gamut range.
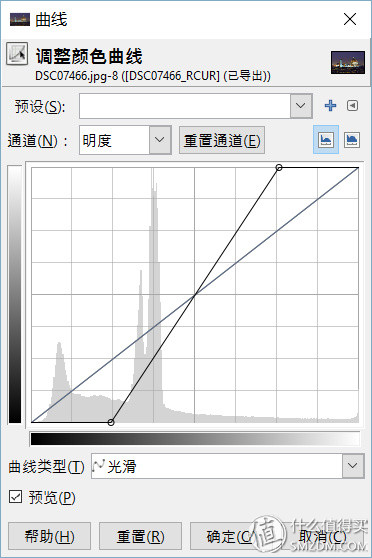
curve
Curves are the most powerful and flexible of the commonly used brightness adjustment tools. It is no exaggeration to say that it can replace all other brightness adjustment tools (even sub-channel adjustments can even replace saturation tools). The common interface for the curve tool is this:
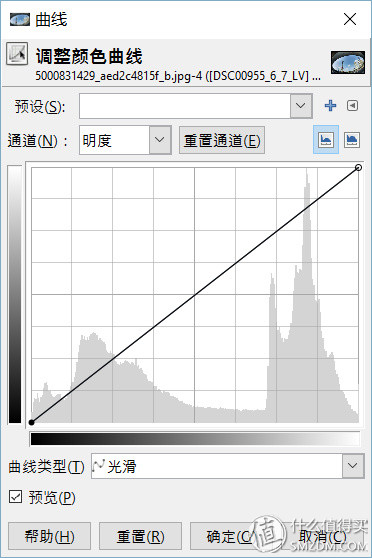
Below to explain how to understand this tool, it is not complicated. The interface of the curve tool is a two-dimensional plane coordinate system. The abscissa (x-axis) represents the overall brightness range of the original image (8-bit brightness image is 0-255), and the ordinate (y-axis) represents the adjustment. The brightness range of the image (target map). Therefore, the range of the entire coordinate system is from (0, 0) to (255, 255), while the middle line represents the mapping of pixel brightness between the original image and the target image. Specifically, the coordinate value (x, y) of each point on the line indicates that the luminance of all the pixels with brightness x in the original image is y in the target image. When no adjustment is made, this is a straight line with a slope of 1 (45 degrees), which means that y = x, that is, the original image and the target image are exactly the same. When adjusting, this curve directly changes the relationship between the pixel brightness of the original image and the target image. such as:
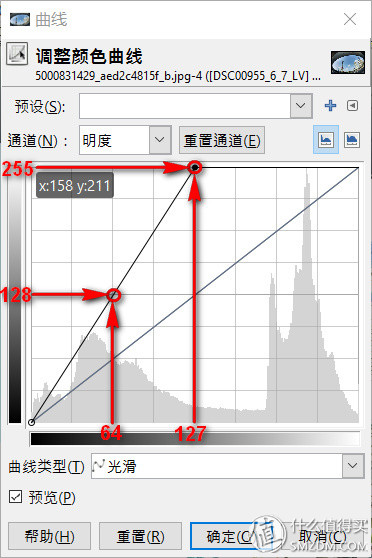
The curves in this graph (the black one, the blue one is the y = x reference line), you can see the two marked points (127, 255) and (64, 128), which shows that the brightness in the original image is The point of 127 (and more than 127) becomes 255 in the target map, and the point of luminance 64 in the original map becomes 128 in the target map. A certain degree of knowledge of junior mathematics has taught that the functional expression of this line is y = 2x, indicating that all pixels in the target map are equal to twice the luminance value of the corresponding pixel in the original image. It can also be seen from the figure that in the range of x > 127, the curve is directly attached to the ceiling, because the maximum value of the brightness is only 255, and when x > 127, y > 255, so all are changed Become 255 (white), this is overflow.
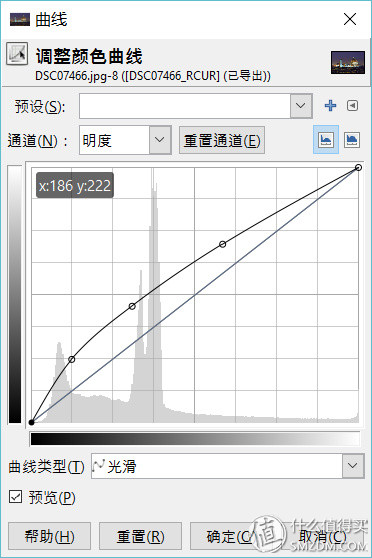
For the curve tool, of course, it is seldom used. In many cases, the curve is irregularly curved. For example:
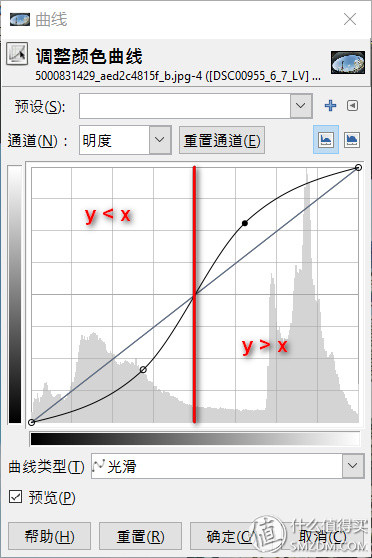
This is a common S-curve adjustment in post-processing. According to the middle blue reference line (y = x), it can be seen that the left half (dark part) of the curve falls below the reference line, indicating that y < x, that is, the pixels on the target image correspond to the pixels of the original image. To be dark, and the right half (bright) falls above the reference line, indicating that y > x at this time, that is, the pixels on the target image are brighter than the pixels corresponding to the original image. It can be seen that this adjustment method makes the dark part darker and the bright part brighter, which is a way to increase the contrast. However, since the two ends of the curve are still (0, 0) and (255, 255), this means that the darkest and lightest parts are not affected. So compared to a simple contrast adjustment tool, this approach does not cause overflow problems.
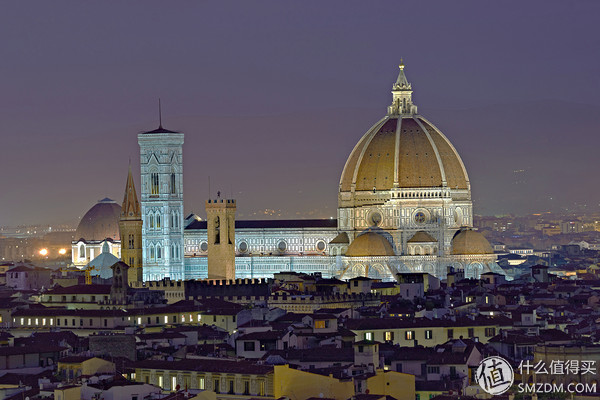
Comparing the effect of adjusting the contrast of the curve and simply adjusting the contrast (Lujiazui's picture you are probably tired of seeing it, for a piece of Florence):
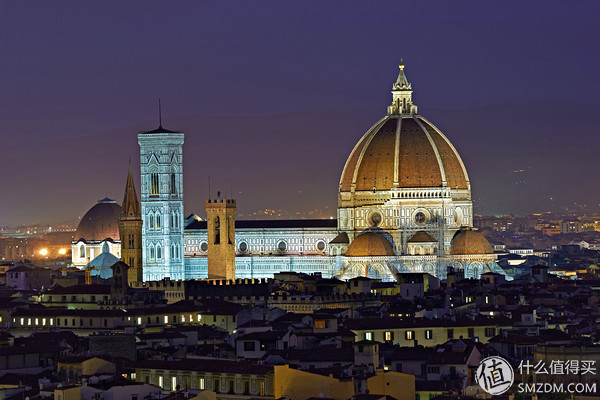
(Original)

(increases the contrast by 50)

(S-curve increases contrast)
It can be clearly seen that, compared with the direct increase in contrast, the image adjusted by the curve not only increases the contrast, but also the details of the dark houses in the foreground are well preserved, unlike the previous one. It's dark. Conversely, if you want to reduce the contrast, turn the curve into an anti-S shape, lower the highlight, and increase the darkness:

Effect comparison:
(Original)
(after curve adjustment)
Of course, the curve is not only used to adjust the contrast, it does not have to be so smooth, in theory you can put the curve into any shape, such as:
Even so:
Of course, the effect may be very strange, and in most cases it doesn't make sense to make the curve a strange shape. I just want to say that the curve is a very flexible and powerful tool that can be used to replace all other brightness adjustment tools. Next, let's take a look at how other common adjustments can be expressed using curves (Gimp can convert brightness/contrast and gradation adjustments directly into curves, which is particularly convenient for demonstrating this). For example:
Increased brightness by 60:

Convert to curve:

It can be seen that the brightness adjustment of GIMP software adopts the method of extending the brightness range (the darkest part is increased by 60, the brightest part is unchanged, and the middle part is adjusted proportionally), so simply increasing or decreasing brightness does not cause overflow.
Increase the contrast by 50:
Convert to curve expression:
It can be seen that simple contrast adjustment is actually simply increasing the slope of the curve. The curves on this chart were stepped on the floor and ceiling on the left and right sides, respectively, indicating that this treatment may cause overflow of light and dark areas. It can be compared with the previous sigmoid curve.
Input level 50~255:
Convert to curve:
Gamma is set to 0.6 in the level:
Curve expression:

It can be seen that the overall darkens, but the two ends remain unchanged. From here, one can also understand why Gamma becomes a non-linear map because the corresponding curve is curved rather than a straight line.
Gamma is set to 1.5:

Curve expression:
The whole brightens, the same at both ends.
In summary, the curve can be said to be the ultimate tool for adjusting brightness, contrast, and other parameters. As the first line is in hand, I have...
Exposure compensation adjustment
This tool is standard and most commonly used in Raw processing software, but it is rare in ordinary image processing software (Photoshop has it). Here's a screenshot of Raw Therapee:
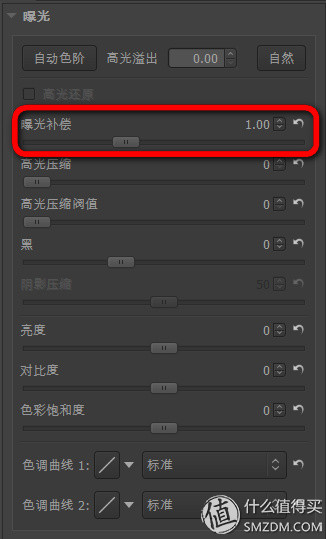
The first thing you should do when dealing with raw images is this parameter (if you need to adjust the white balance, it should be before this). Exposure compensation is somewhat different from pure adjustment of brightness. First of all, its unit is Ev, which is the “fileâ€. The unit of exposure for this unit and the camera is the same. For each additional EEV, the exposure is doubled. This is equivalent to using software to modify the camera exposure during simulation. For example, when you pull the exposure-compensated slider to 1.00, the result is equivalent to a doubled camera shutter speed or a one-stop increase in ISO or a shift in aperture (ignoring the change in depth of field). Theoretically speaking, double the exposure, which means that all pixels have a brightness of 1.4 times (square root of 2). Similarly, for every 1 Ev reduction, the brightness is divided by 1.4. Therefore, exposure compensation is equivalent to zooming in or out the brightness of all pixels at the same multiple. Therefore, the exposure compensation of +1.00 in the above figure is roughly equivalent to the following effect:
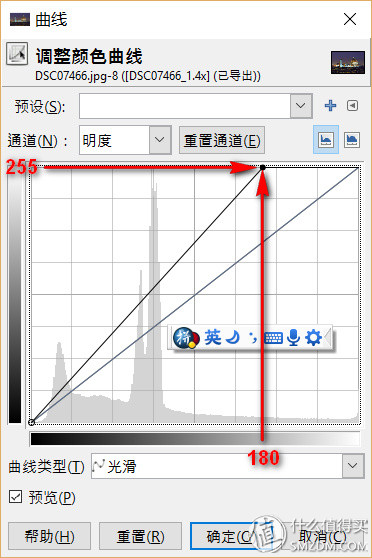
Here's 180 = 255 / 1.414. Experiment to verify. Original (Aden Sinian and Zhuo Mara wrong):

Curve adjustment (brightness × 1.4)

Exposure compensation (+1 Ev)

Comparison can see that the conclusion is basically reliable.
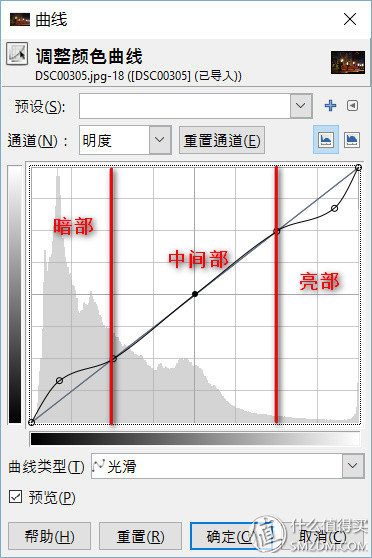
Shadow/Highlight adjustment
This is an equally common and well-used feature in all Raw processing software and some general-purpose image processing software. The following still uses Raw Therapee as an example (Photoshop also has this feature, the interface is similar):

This tool is mainly used to adjust the dark and bright parts of the picture. Among them, the shadow slider can brighten the dark part, and the highlight slider can darken the light part. This kind of operation can make the picture close to the black and white part show more details, and at the same time, the overall contrast of the picture is reduced. This reduces the risk of overflow in subsequent processing. The difference from ordinary contrast-reducing operations is that the shadow/highlight operation affects only dark and bright pixels and has little effect on the pixels of intermediate brightness. As for how to divide the dark part/middle part/bright part, it is controlled by the slider of the tone range. The larger this value is, the wider the dark part and the bright part are. Therefore, the effect of adjusting the pixel on the brightness of the entire screen is greater. Big. The adjustment of shadows and highlights can also be converted into curve representations, as shown below:
You can compare the shape difference of the anti-S curve of the front curve part. Also look at an actual comparison.
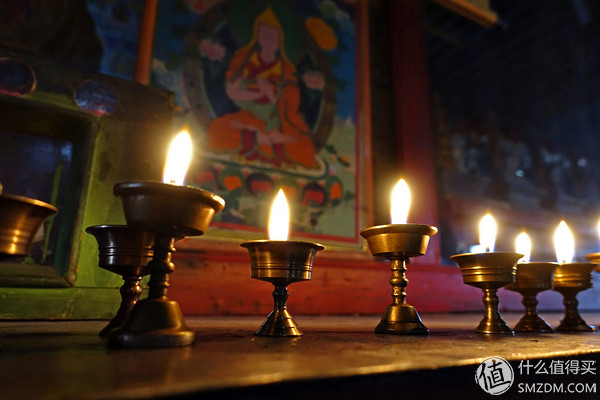
The original picture (Zhaohua Temple on the edge of Tengger Desert in Inner Mongolia, reportedly built by Cangyang Gyatso):
Anti-S curve adjustment:

Shadow/Highlight adjustment:
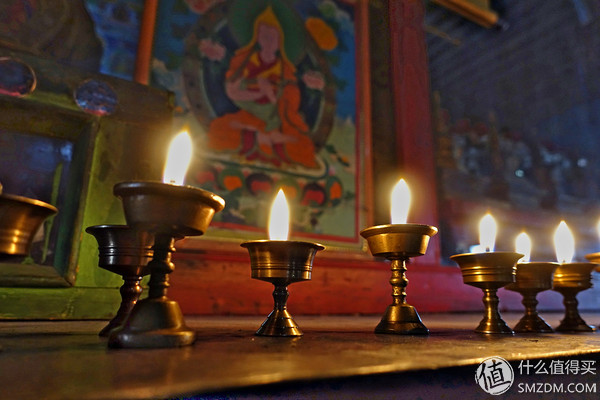
It can be clearly seen that the effect of the anti-S curve does reduce the overall contrast, but at the cost of graying the screen. Shadow/highlight tools brighten dark areas (such as the background in the upper-right corner) and depress light areas (such as candlelight) more effectively than anti-S-shaped curves, but midtone components (such as the back Thangka and candlesticks) are affected To be much smaller, there is no graying effect.
It is worth mentioning that the shadow/highlight function should not be used too much force, otherwise it will easily cause the picture and unnatural.
Saturation adjustment
Finally talk about this. Saturation adjustment is also a feature of all image processing software. Here is a screenshot of Photoshop:
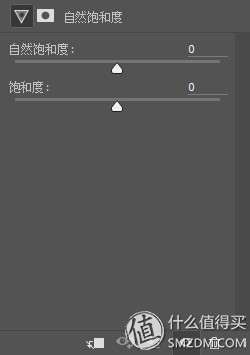
This thing is often the favorite for beginners. Once the color is found to be not good enough, you immediately think of saturation. In fact, to be honest I think this feature is the most useless. Because in many cases, the so-called color is not enough, in fact, it is not necessarily a problem of color, on the contrary is likely to be insufficient contrast. Moreover, adjusting saturation does not give the kind of rich colors that people generally like. On the contrary, it tends to make the colors too bright and unrealistic. In contrast, the "natural saturation" function is much softer and the effect is more natural. I personally almost never used saturation adjustments in post processing. Even if I used them, I would reduce the saturation and never increase it.
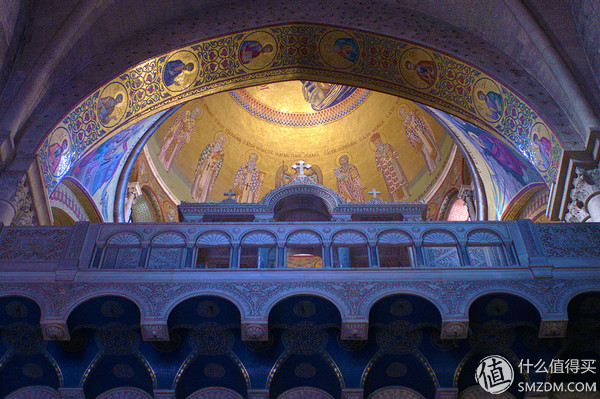
Simple test. This original picture was taken at the Church of the Holy Sepulchre in Jerusalem (where Jesus was resurrected):

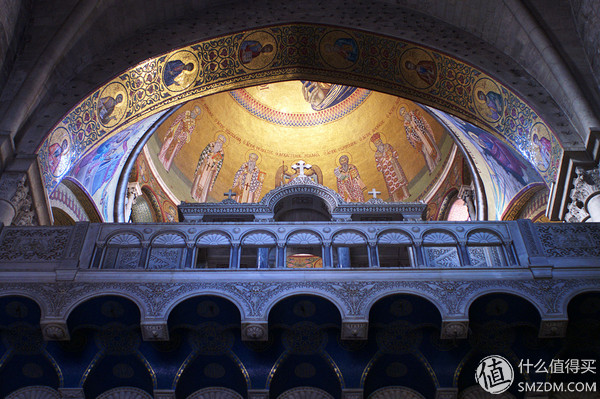
Saturation increased after 100 effects:

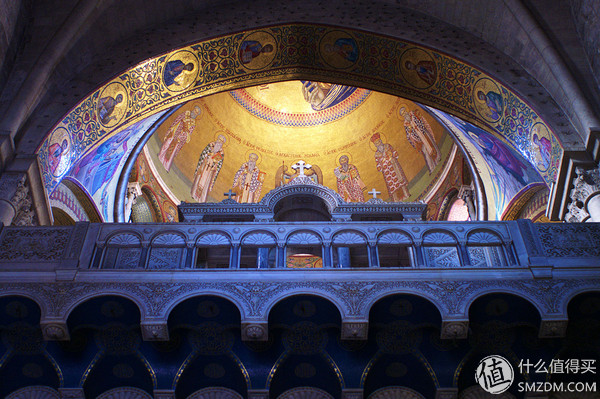
The effect of natural saturation increased by 100:
S-curve adjustment increases the effect after comparison:
S-shaped curve adjustment and natural saturation increase 60 effect:
It can be seen that if the taste is lighter, the natural saturation is completely sufficient. If the taste is relatively heavy, the natural saturation + contrast adjustment can be relatively rich, and the effect of only a large adjustment of the saturation can be unnatural.
Say so much, the following can be an example to practice.
Basically, for the original Raw of a digital photo, the simplest sequence of late adjustments looks like this:
1. White Balance - 2. Exposure Compensation - 3. Color Processing (Hue, Contrast, Saturation, etc.) - 4. Detail Processing (noise reduction, sharpening, stain repair, etc.) - 5. Other effects (each Other filters).
Among them, 1 and 2 are recommended to be done in Raw processing software. 3, 4 If the Raw processing software is strong enough, it is recommended to do it in Raw processing software. Because the Raw format has a brightness range of up to 14 bits, both the latitude and dynamics are much better than 8-bit brightness JPG files, so the impact on image quality can be minimized when adjusting exposure and color. This is why I have always emphasized the reason for shooting with Raw.
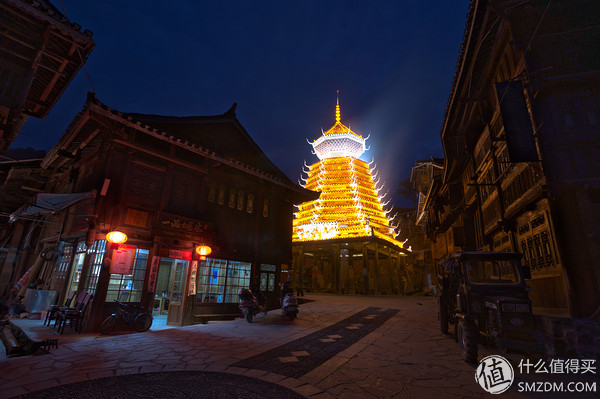
The following original appearance:
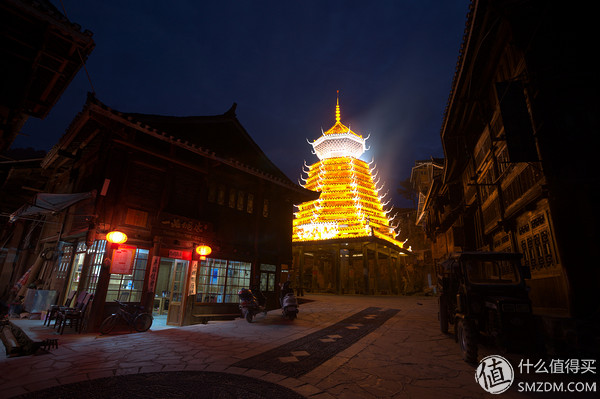
The bemused landlord actually took out a night scene. This photo was taken in a Dongzhai village in southeastern Yunnan. The gleaming building in the middle is a landmark building in the Dong village. The original film was photographed on a tripod with exposure parameters of 16 mm, f/8, 13 seconds, and ISO 100. This kind of scene is a typical late-stage problem. The contrast of the original film is too large. The Drum Tower in the bright part is close to the overexposure. The surrounding buildings are basically under-exposure due to too much difference in brightness. The brightness of the sky is not ideal.
After importing with Raw Therapee, first look at the white balance:

This is the initial value of the original white balance. Basically, there is not much need for adjustment because the white balance of the camera is more accurate and I do not want to pursue a particular color cast effect. Adjust the color temperature down to 2700K and make the sky look bluer:

Next, adjust the exposure. Obviously for such a very bright part of the film is very dark, hastily increase or reduce the exposure compensation will not work, Gu can not care for the other end, so you can only apply the shadow / highlight tool:

Both the bar shadow and the highlight slider are dragged to 30 while the tone range is set to 50 to avoid adjusting the midtones too much:
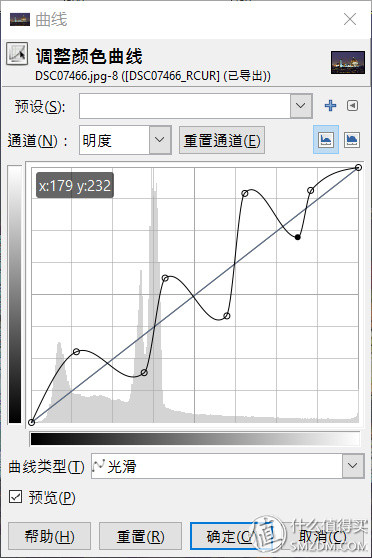
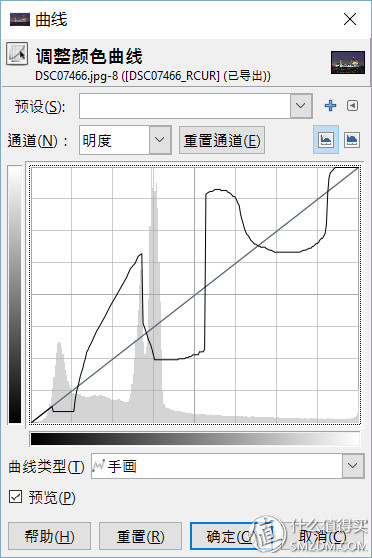
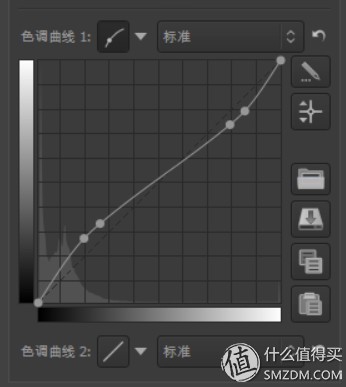
Adjust the curve slightly to further reduce the contrast, brighten the dark areas, and reduce noise:
Compare with the original film:
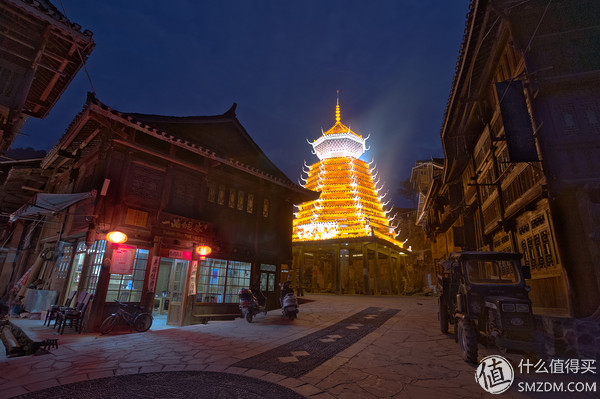
Basically for such a film, the primary processing method can only do this. The details of the dark part of the entire picture have been greatly improved, while the bright part has not been substantially affected, but the colors still look boring and not transparent. If you apply a more advanced method, the final effect can be this:

Even so:

How to get it? This article is here. Want to know what happened to me, and listen to the next decomposition.
Ei 96 Transformer,96 Va Transformer,Ac Current Transformer,Ei Transformer,10kva transformer
Guang Er Zhong(Zhaoqing)Electronics Co., Ltd , https://www.gezadapter.com