It was another very hot weekend, in addition to the hot weather, and the fiery World Cup. Today's technology dry goods prepared by artificial intelligence headlines for everyone, so that everyone can easily complete the application of AI application practice under the air conditioning, eat melons and watch the ball without delay. How many times, after we searched a lot of resources and technical guidance, during the actual operation, an error was reported and the road forward was terminated. The editor has also experienced this kind of mental journey, so a good guide is too loving for the students who are just beginning to practice, not only saves a lot of time, but also the operation and ideas are clear. If you are just getting started with AI Xiaobai and want to have a deeper understanding of AI applications through some simple application practices, start now with us!
About the author: Zou Xin, currently the R & D manager of Microsoft Asia Research Institute, is responsible for Bing search client, Bing input method, Bing dictionary, Microsoft Xiaona and other products. He has published three books, "The Way to Move Mountains", "The Beauty of Editing" (cooperation), and "The Law of Construction".
The following is an introduction to the handwriting recognition application of Teacher Zou Xin ’s AI application development practice series of tutorials. This tutorial is divided into three steps:
Build your development environment from scratch, whether it is Windows or MAC OS environment
Simple MNIST model training
Application Practice of Handwriting Recognition
This wave of operations can be easily completed by everyone. The tutorial not only introduces what needs to be done at each step, but also prepares you with a valuable command line, code, clear instructions for the version number of each installed software, links to download or visit, and Screenshots and tutorial videos can be said to be very comprehensive and in place.
â–ŒBuild a development environment for your Windows and start training the first model
(1) Preparation: A computer with internet access, using win10 64-bit operating system, please make sure that the mouse, keyboard, and monitor are good
(2) Installation steps:
Install Git
Install VS, wait for the time to see the network status, maybe you can watch the halftime ball anyway, do n’t worry, do n’t worry.
Install python
Install CUDA and cuDNN: This is the most tedious step in the tutorial. This step directly increases the average difficulty of the tutorial.
Configure the machine learning environment: This is the simplest step in the tutorial. In order to facilitate the user to configure the environment, Microsoft provides a one-click installation tool! Simply industry conscience!
Install VS Tools For AI plugin
(3) Offline model training: note that the latest mnist.py file is used in this process
Article link:
https://blog.csdn.net/softwareteacher/article/details/80770079
â–ŒBuild a development environment for your MAC OS and start training the first model
(1) Preparation: A computer with internet access, using MAC OS operating system, please make sure that the mouse, keyboard and monitor are good
(2) Installation steps:
Install VS, and friends who have the same time may wish to consider watching halftime!
Install python
Install the Tools for AI plugin
Install Git
Download the machine learning sample library
(3) Model training: It is also the first model of Xiaobian! In the tutorial, the child added a supplement to explain how to train on remote Linux.
Article link:
https://blog.csdn.net/softwareteacher/article/details/80770239
â–ŒAI application development practice-entry of handwriting recognition application
Knock on the key! ! ! After setting up the environment and model training, you can finally get started with application practice. The following is the full text of the handwriting recognition application tutorial, enjoy!
Handwriting recognition applications have become very popular, such as input methods, text recognition in pictures, etc. However, for most developers, how to implement such an application will still feel inaccessible. This article starts with a simple MNIST-trained model and joins you in handwriting recognition.
At the end of this tutorial, you will get a usable AI application, perhaps your first AI application. Although there is still a large distance from actual use (the specific gap will be analyzed later in the article), it will give you a preliminary understanding of AI applications and the ability to gradually build a model that can be practically applied.
Original link:
https://blog.csdn.net/softwareteacher/article/details/80770347
▌ Preparation
Computer with win10 64-bit operating system
Refer to the previous article on the practical application of AI application development-configuring the environment from scratch. Train and export the MNIST model on a computer.
▌ 1. Idea
After the introduction of setting up the environment in the previous article, you can get a model that can recognize a single handwritten number, and the accuracy of the recognition will be 98% or even 99%. So how do we use this model to build applications?
The general steps are as follows:
Realize a simple interface, turn the user's input with a mouse or touch screen into a picture.
Wrap the generated model into a class with a public data interface.
The input picture is normalized into a format usable by the data interface.
Finally, use the model to inference which figure the picture should be and display it.
Is not it simple?
▌ 2. Hands on
Step 1: Get handwritten numbers
Question: How do we get handwritten numbers?
Answer: We can write a simple WinForm drawing program, so that we can use the mouse to write numbers, and then save the picture.
First, we open Visual Studio and select File-> New-> Project.
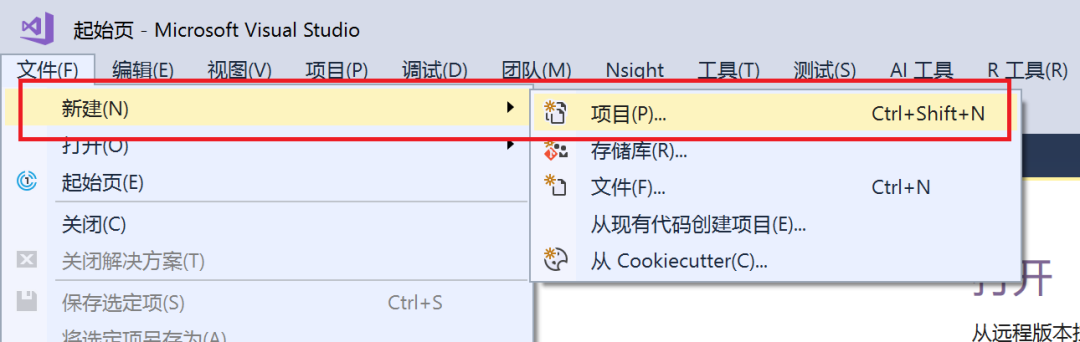
In the pop-up window, select Visual C #-> Windows Form Application. The project name may be called DrawDigit, and the solution name may be called MnistForm. Click OK.

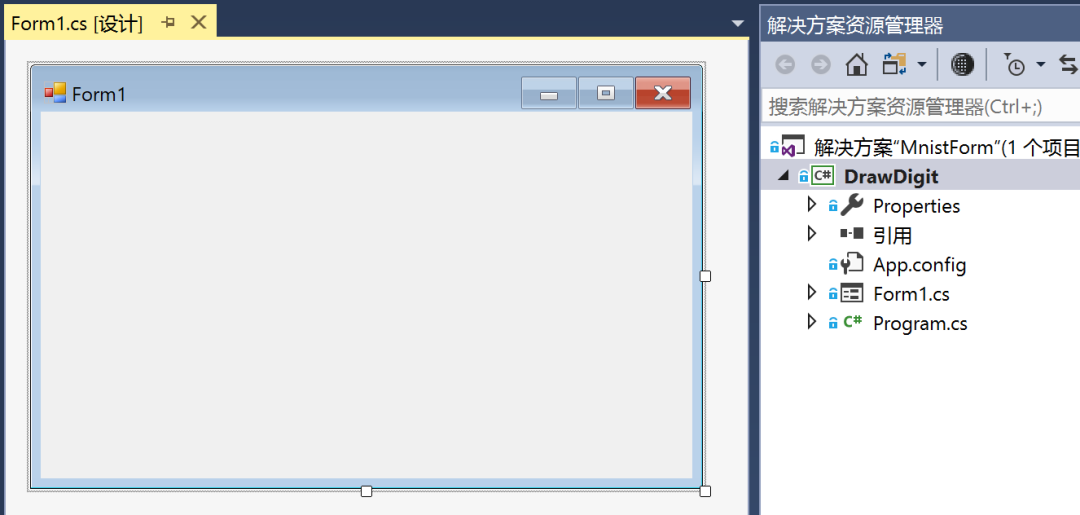
At this time, Visual Studio also automatically popped up a window design.
Right-click on the DrawDigit project, select Properties, and change the platform target from Any CPU to x 64 in the Generate column.
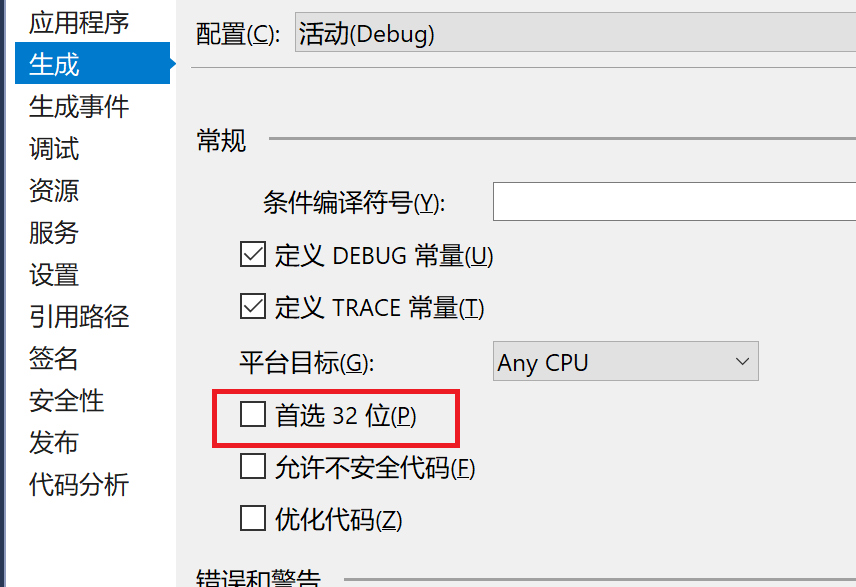
Otherwise, DrawDigit (32-bit preferred) and the MnistForm (64-bit) compilation platform it references are inconsistent and will cause a System.BadImageFormatException.
Then we make some simple modifications to this window:
First, we open the toolbox on the left side of the VS window. This window program requires the following three components:
1. PictureBox: used to write numbers and save the numbers as pictures
2. Label: used to display the recognition results of the model
3. Button: used to clear the handwriting result of PictureBox
After some simple selection and dragging and resize, this window is now like this:

Some considerations
These components can be modified by right-clicking-> view properties and modify their settings in the properties
In order to easily convert the pictures in PictureBox into a format that Mnist can recognize, PictureBox needs to be square
These controls can be given meaningful names.
You can adjust the size and font of the label control to make it more beautiful.
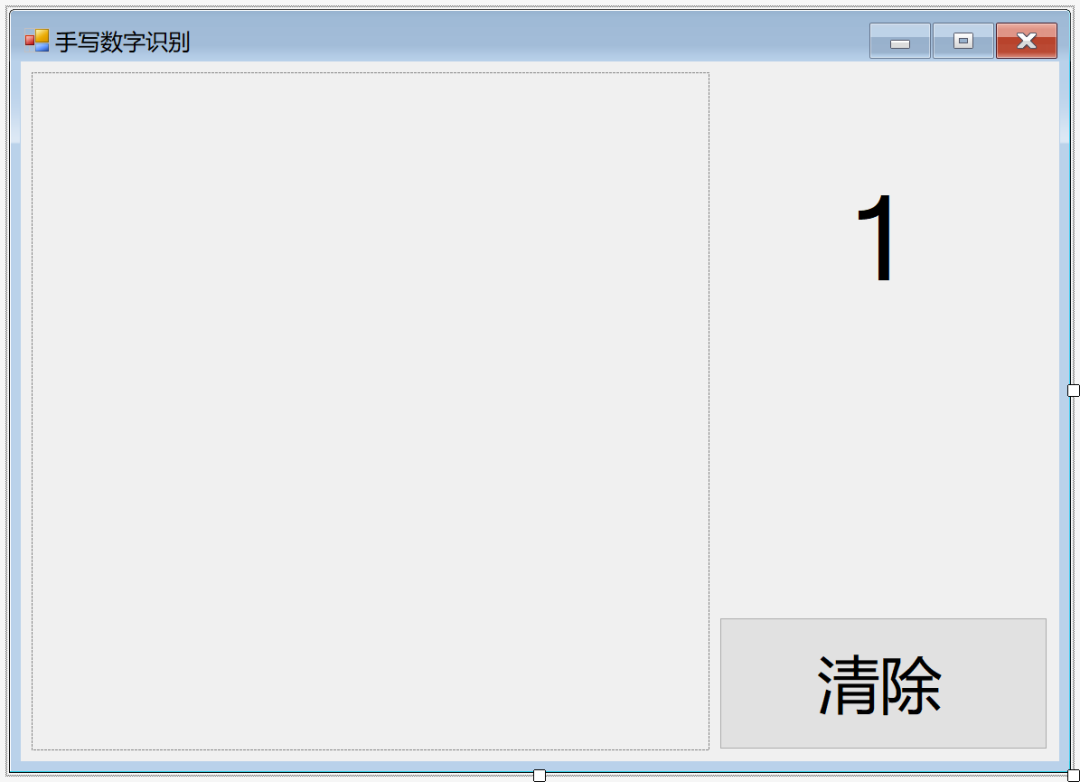
After some simple adjustments, this window now looks like this:
Now let's happily add events to these components!
Still in the properties window, we select a component, right-click-> view properties, click the lightning symbol, and bind the corresponding event to the component. After each binding, it will jump to the code part and generate an empty function. Click back to the design view to continue.
| Component type | event |
| pictureBox1 | Double-click MouseDown, MouseUp, MouseMove under Mouse to generate the corresponding response event function. |
| button1 | As above, double-click Click under Action. |
| Form1 | As above, double-click Load under Behavior. |
Then we start to complete the corresponding function body content.
Note that if you change the name of the control above, the following code needs to be changed accordingly.
Stop talking nonsense!
using System; using System.Collections.Generic; using System.ComponentModel; using System.Data; using System.Drawing; using System.Drawing.Drawing2D; // Used to optimize the results of drawing using System.Linq; using System.Text; using System.Threading.Tasks; using System.Windows.Forms; using MnistModel; namespace DrawDigit {public partial class Form1: Form {public Form1 () {InitializeComponent ();} private Bitmap digitImage; // Used to save handwritten digits Private Point startPoint; // Used to draw a line segment as the initial endpoint coordinates of the line segment private Mnist model; // Used to identify handwritten digits private const int MnistImageSize = 28; // The input image size required by the Mnist model private void Form1_Load (object sender, EventArgs e) {// When the window loads, draw a white box model = new Mnist (); digitImage = new Bitmap (pictureBox1.Width, pictureBox1.Height); Graphics g = Graphics.FromImage (digitImage); g.Clear (Color.White); pictureBox1.Image = digitImage;} private void clean_click (object sender, EventArg se) {// When click to clear, draw a white box again, and clear the text displayed by label1 digitImage = new Bitmap (pictureBox1.Width, pictureBox1.Height); Graphics g = Graphics.FromImage (digitImage); g.Clear (Color.White); pictureBox1.Image = digitImage; label1.Text = "";} private void pictureBox1_MouseDown (object sender, MouseEventArgs e) {// When the left mouse button is pressed, record the start of the line segment that needs to be drawn Start coordinate startPoint = (e.Button == MouseButtons.Left)? E.Location: startPoint;} private void pictureBox1_MouseMove (object sender, MouseEventArgs e) {// When the mouse is moving and is currently in the drawing state, according to the mouse ’s Draw line segments based on the real-time position and the recorded starting coordinates, and update the starting coordinates of the line segments to be drawn if (e.Button == MouseButtons.Left) {Graphics g = Graphics.FromImage (digitImage); Pen myPen = new Pen (Color .Black, 40); myPen.StartCap = LineCap.Round; myPen.EndCap = LineCap.Round; g.DrawLine (myPen, startPoint, e.Location); pictureBox1.Image = digitImage; g.Dispose (); startPoint = e.Location;}} private void pictureBox1_MouseUp (object sender, MouseEventArgs e) {// when the left mouse button is released // it also starts to process the picture for inference // temporarily Don't process the code here}}}
Step 2: Pack the model into a class
Packaging the model into a C # is a cumbersome step in the entire process. Fortunately, Tools for AI provides good support for this. For more information, you can see here (https://github.com/Microsoft/vs-tools-for-ai/blob/master/docs/zh-hans/docs/model-inference.md).
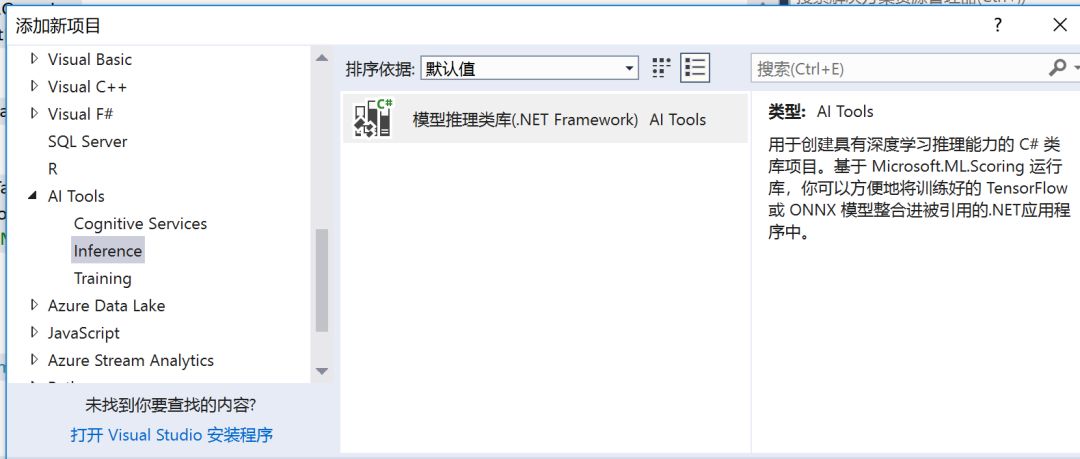
First, we click the right mouse button under the solution MnistForm, select Add-> New Project, select AI Tools-> Inference-> Model Inference Class Library in the pop-up window, the name may be called MnistModel, click OK, so we have more an item.
Then configure the name and location of the project yourself and click OK.
Then a wizard for creating a model inference library pops up. At this time, we need to choose the model we trained before ~
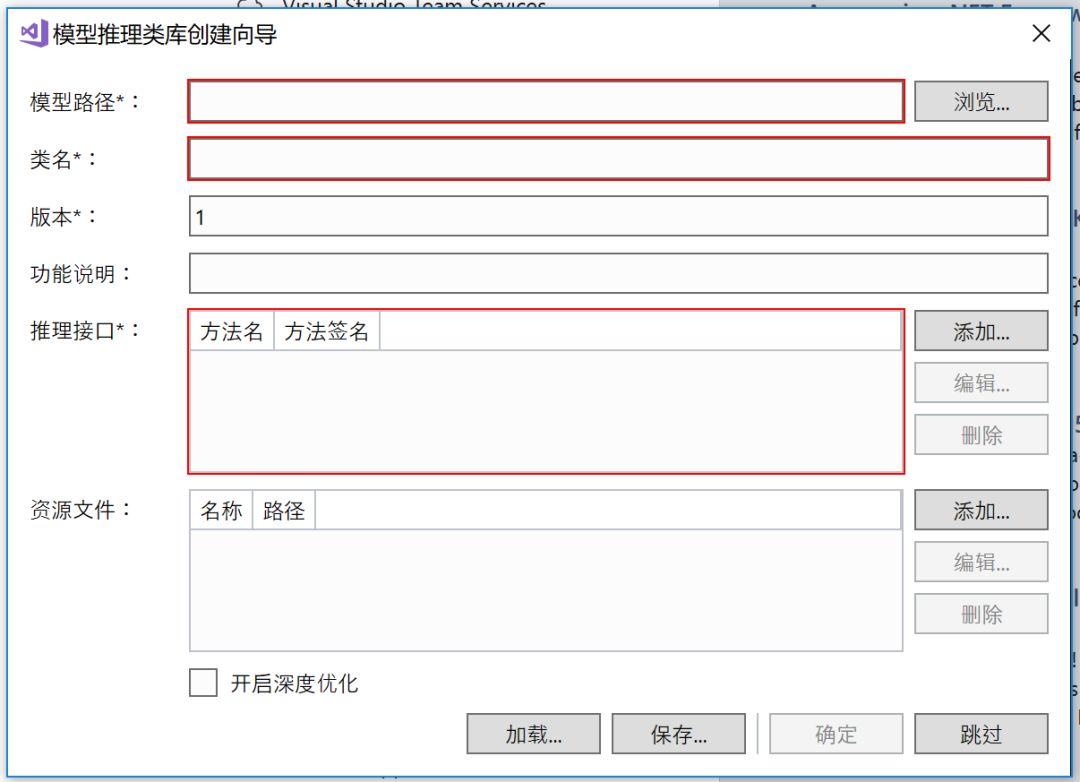
First select the path of the saved model file in the model path. Here we use the actual application development in AI-configuring the model trained and exported from the environment blog from scratch
note: The model can be found in the / samples-for-ai / examples / tensorflow / MNIST directory, where the output folder holds the checkpoint file and the export folder holds the model file.
For TensorFlow, we can choose the checkpoint .meta file, or the saved model .pb file
Here we choose to practice in AI application development-configuring the environment from scratch. SavedModel.pb file in the checkpoint in the export directory generated at the end of this blog. At this time, the program will automatically configure the configuration inference interface, see the following figure:

The class name can be defined by yourself, because we are using MNIST, then the class name is called Mnist, and then click OK.
In this way, in the solution explorer, under the solution MnistForm, there is an additional MnistModel:

Double-click Mnist.cs, we can see that the project automatically encapsulated the model and generated a public infer function.
Then we right-click on the MnistModel, and then choose to generate, wait for a while, this project can be used ~
Step 3: Connect the two parts
This step is almost like this feeling:
I have an apple, I have a pen. AH ~, Applepen
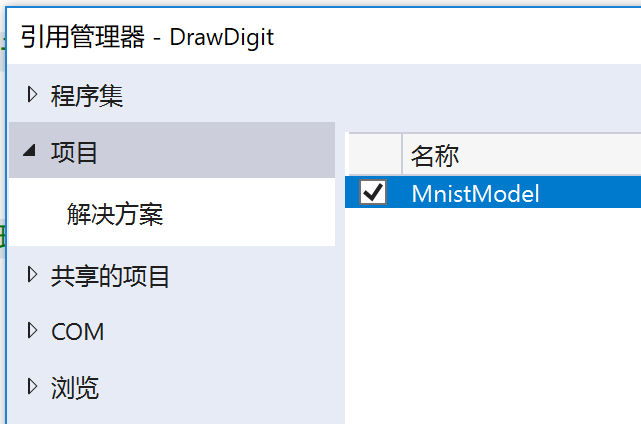
First, let's add a reference to DrawDigit so that it can use MnistModel. Right-click on the DrawDigit project reference, click Add Reference, select MnistModel in the pop-up window, and click OK.

Then, because the input of the MNIST model is a 28 × 28 grayscale image with white and black background, we first have to do some processing on the image.
First convert the picture to a size of 28 × 28.
Then convert the RGB image into a grayscale image, normalize the grayscale to the range [-0.5,0.5], and convert it to white on a black background.
Finally, the picture is packaged in the format required by the mnist model and sent to it for inference.
So, we add these codes in pictureBox1_MouseUp, and add using MnistModel; in the file:
private void pictureBox1_MouseUp (object sender, MouseEventArgs e) {// when the left mouse button is released // start processing pictures for inference if (e.Button == MouseButtons.Left) {Bitmap digitTmp = (Bitmap) digitImage.Clone (); // Copy digitImage // Adjust the size of the picture to the size that the Mnist model can receive: 28 × 28 using (Graphics g = Graphics.FromImage (digitTmp)) {g.InterpolationMode = InterpolationMode.HighQualityBicubic; g.DrawImage (digitTmp, 0, 0 , MnistImageSize, MnistImageSize);} // Convert the picture to a grayscale image, and save the pixel information of the picture in the list var image = new List (MnistImageSize * MnistImageSize); for (var x = 0; x> (); batch.Add (image); // Transfer the picture to the mnist model for inference var result = model.Infer (batch); // Output the inference result label1.Text = result.First (). First (). ToString () ;}}
Finally, let's try it out ~
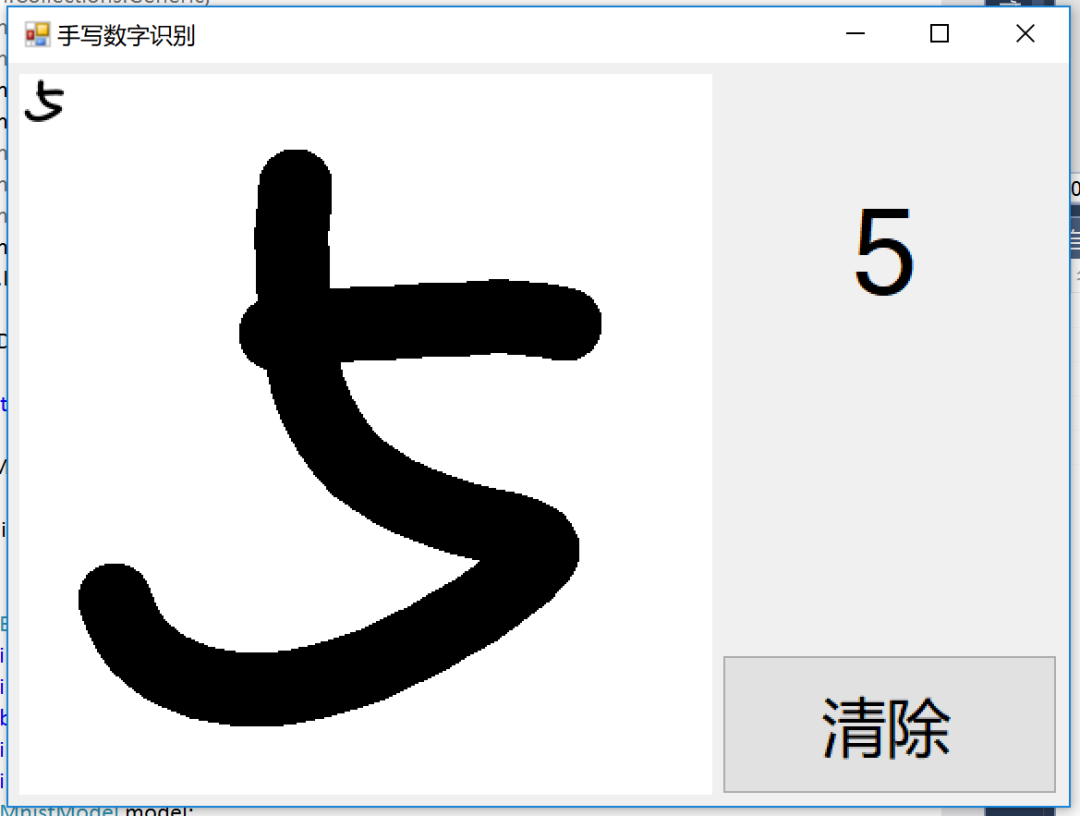
â–ŒThree. Effect display
Now we have a simple applet that can recognize handwritten digits.
Hurry up and try the effect ~
â–ŒNote
1. There must be no Chinese characters in the path, otherwise the model may not be found.
â–ŒAdvanced
So, what if you want to recognize multiple hyphenated numbers, or support letters? Everyone will find that if the number is written very small, or if it is not written in the middle, the recognition rate will not be high. To solve these problems and make a real product, there is more than this model. For example, in multiple digit recognition, you may want to split the graph based on experience, or train another model to detect and segment the digits. To support letters, you need to retrain a model that contains handwritten letters and prepare data for more letters. To solve the problem of too small characters, it is necessary to check the size of the characters, do appropriate enlargement and so on.
We can see that there are still many functions to be implemented between a trained model itself and an actual application. I hope that our series of introductions can help you bring the concept of machine learning into the traditional programming field and make smarter products.
DVB Antenna,DVB-T1 Antenna,DVB T2 Antenna,DVB T2 Antenna Outdoor
Yetnorson Antenna Co., Ltd. , https://www.yetnorson.com