[Home Theater Network HDAV.com.cn] Many friends blindly bought their home theater home, but then did not know how to use it. China Home Theater Network launched a series of tutorials on "How to Buy a Home Theater", hoping to help entry-level users. Before we talked about how to do the first three steps of how to do the home theater (see: "Buy the second step of the audio: home theater wiring and Speaker placement", "Buy the audio third step: home theater speaker installation and audio Debugging. How is there no first step? The first step is to ship home, this part is omitted, the essentials are to grab a few strong.), today is to say the fourth step: " Buy the sound of the fourth step: Home Theater Amplifier Setup .
The setup of the home theater amplifier has become very simple with the help of automatic sound field correction, but I think it is necessary to talk about it. The setting of the home theater amplifier is actually foolish, because the most difficult convenience is the adjustment of the amplifier, but with the help of automatic test MIC plus various sound field correction techniques, this process has become very simple. However, we still have to explain it once in a unified way.
First, configure the number of speaker channels
Before debugging, the most important thing is to tell the amplifier, what kind of system you are using now. How many channels do you plan to use, where to put the boxes, and whether there are two or three zones to enlarge. In short, you should assign the various terminals of the amplifier according to your actual position.
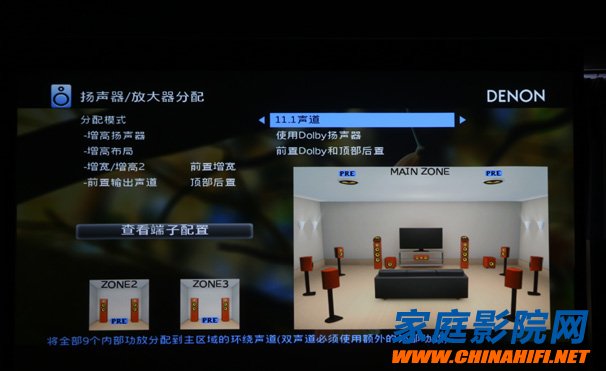
Choose how many channels you have, this is a 11.1 X5200W setting interface. Note that the pre-output channel marked inside is the additional driver to be added.
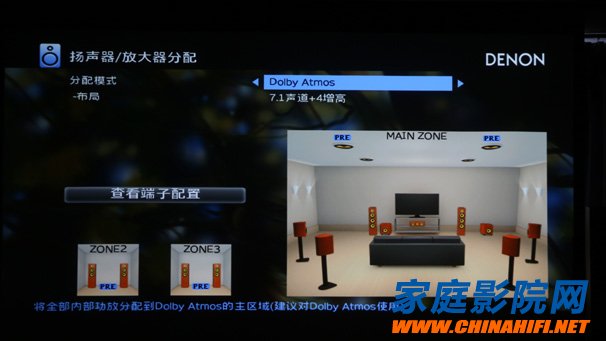
The most standard 7.1.4, all channels are used. So you look at the small picture below, the second and third areas output sound signals, regardless of the drive speaker
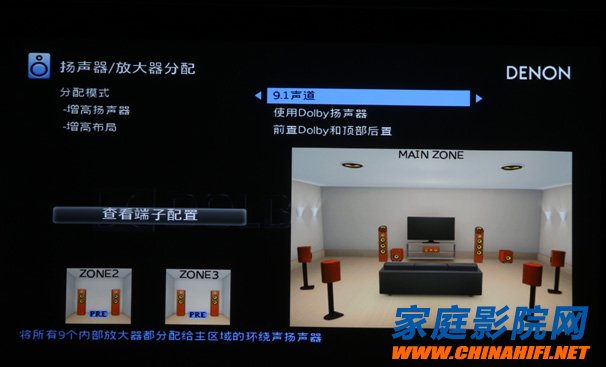
If you are just a 9.1 channel, then that's it.
Second, determine the size of the speaker
After determining the position and number of the speakers, the size of the speakers is determined. In the settings of the amplifier, it is set to "large" or "small". “Big†means that the speaker will emit a full-band (20hz~20kHz) sound, while “small†will cut off the low-frequency part of the sound, so that the speaker is only responsible for the frequency band above the crossover point. In fact, in use, even if I use the floor-standing speakers, I will set all the channels to "small", because if the main box is set to "large", then the low-frequency part of the main box is placed in him. The location generally causes annoying low-frequency standing waves, which is a difficult problem to solve. At the same time, the power will be more difficult when driving the speakers. Therefore, we prefer to cut off this part of the low frequency from the speaker and throw it to the subwoofer for processing.
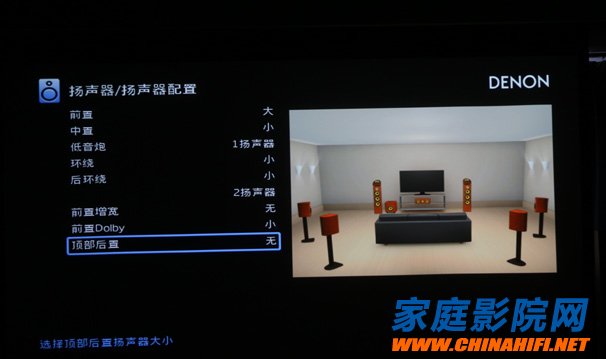
I prefer to set all the speakers to "small".
Third, set the crossover point
Here is to set the frequency of the speaker, we start from which band to cut off the low frequency part. THX's standard is 80hz, and we are very happy to do it. At the same time, it is necessary to set the frequency from which the subwoofer starts to sound. It is usually set to 120Hz, because in the Dolby LEF recording channel, the input signal is 20Hz~120Hz. If you set the subwoofer to 80Hz, the sound in the middle of 80Hz~120Hz disappears.
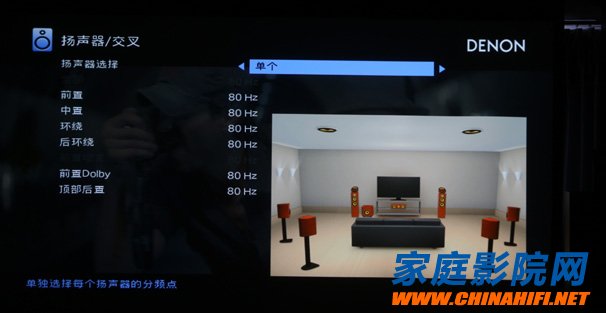
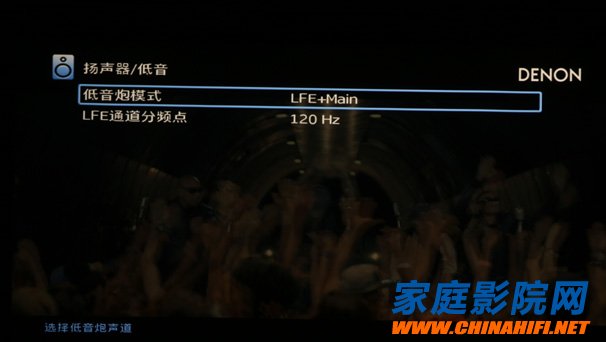
Main is the low frequency signal that the other channels are cut off and will be placed in the subwoofer. The LFE is the original signal in Dolby recording.
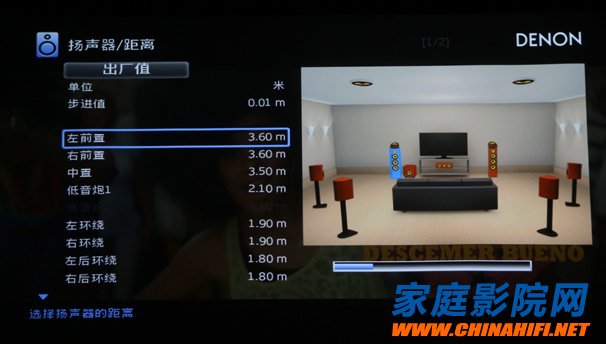
Fourth, the distance
The distance setting of the speakers is very important. I know that it is best for all the speakers to be at the same distance from us. It is best to listen to the sound while sitting in the center of the circle. But our living room can't do this, so we have to let the amp's computer do one thing - that is, through the calculation, let all the sounds of the speakers reach the same time as the human Headphones. The amplifier uses a comb filter to accomplish this. The specific performance is that we can measure the distance from the speaker to the ear and set it in the amplifier.
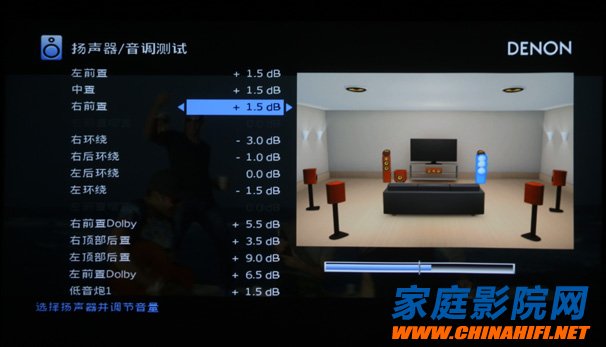
Five, sound pressure
The last step is to set the sound level of all channels, which is the sound pressure. When we are sitting in a pile of speakers, when a channel is too loud, it will cover up the sound of other channels. This is called the small bee effect. At the same time, you will not hear the smooth transition of the sound between the speakers. Therefore, we must set the sound pressure of all channels to be the same size. If you do? Of course, not with your ears, but with a sound pressure meter.
Written in the end: Today is just a process, because to explain the debugging, writing a few books are no problem. It is possible that you still don’t understand what you read today. What should I do? Take out the mic that was sent randomly and connect it to the amplifier. A menu will pop up. Just press the next step! The power amplifier directs the speaker, after the buzz, Save the test results and you can start watching the film. For more information on the basics of home theater, see: From entry to the one-stop navigation of the white home theater knowledge.
More fresh and fun home theater information, please pay attention to home theater network http:// (WeChat: cnhifi), the country's most influential home theater audio player interactive media website.
Focusing on the development and production of Wireless Charging products that make life easier.
Supply various wireless charger including multifunctional Wireless Charger, Car Wireless Charger, Magnetic Wireless Chargin, Wireless Charging Mouse Pad, etc.
We help 200+ customers create custom wireless charging products design for various industries.
Manufacturing high quality products for customers according to international standards, such as CE ROHS FCC REACH UL SGS BQB etc.
Wireless Charging Pad,Wireless Phone Charger,Wireless Car Charger,Bluetooth Charger
TOPNOTCH INTERNATIONAL GROUP LIMITED , https://www.micbluetooth.com