Because each local network environment is different, but everyone is generally using the default settings of Windows 10 to access the Internet, so often encountered such problems in daily use. In fact, many problems we can solve through custom settings.
The connection order is set by yourself
Most laptop users use the Wi-Fi and wired connection to access the Internet. To obtain a more stable Internet connection, many friends at home like to use a wired connection. But by default, the wireless and wired connections of the laptop are automatically networked. How can the notebook automatically select a faster wired network?
For the connection order of network connections, Windows 10 uses "hops" to distinguish, so we can prioritize wired connections by manually modifying the "hop" method. Go to "Network and Sharing Center → Change Adapter Settings", select the current "Wired Connection", right-click and select "Properties". In the opened properties window, double-click "Internet Protocol Version 4 (TCP/IPv4)". Click "Advanced" and uncheck the "Automatic Hop" below the "IP Settings" tab. Change the wired connection to a high priority connection. Change the "Interface hop" to "10". Similarly, set the WLAN. The "Interface hop count" is changed to "20". The smaller the hop count, the higher the connection priority (Figure 1).
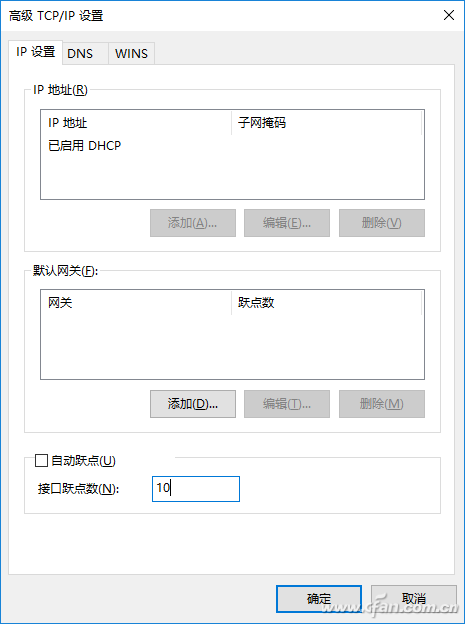
Figure 1 Changing the number of hops
Note that the number of hops here should not be arbitrarily set. It is best to set it according to your actual network conditions. The corresponding relationship between the number of hops and the network speed is shown in Figure 2 (Figure 2).

Figure 2 Relationship between hops and network speed
Wireless connection is more specific
Many offices now have multiple hotspots to access the Internet. By default, Windows 10 will prefer to select the hottest signal hotspot to connect. However, due to the large number of devices connected to Wi-Fi in the office, the hotspot speeds of connecting hotspots are often not satisfactory. We can allow Windows 10 to connect to a specific hotspot so that we can avoid many hotspots connecting users.
First manually connect to the fastest hotspot. After the connection is successful, expand Control Panel\Network and Internet\Network Connections. Remember the name of the wireless connection here. For example, Windows 10 defaults to “WLAN†(Figure 3). .
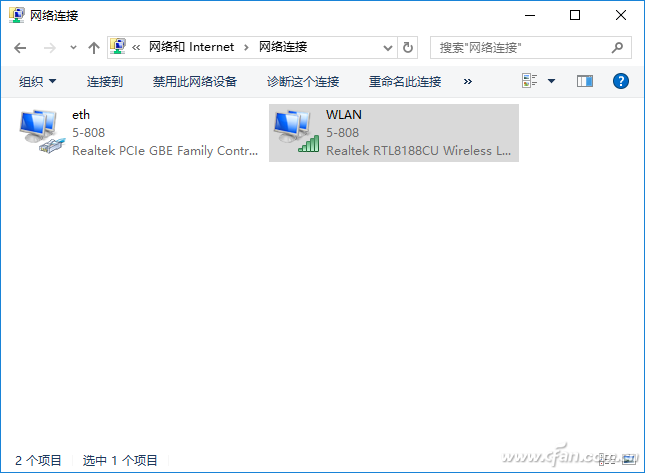
Figure 3 View wireless connection name
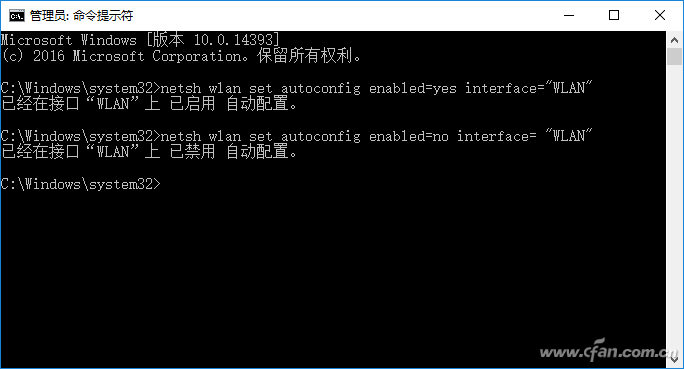
Then start the command prompt as an administrator and enter "netsh wlan set autoconfig enabled=no interface= "WLAN"". This will automatically disable the automatic configuration of the wireless connection. The interface parameter is followed by the name of the wireless connection. If you want to restore The default setting changes the parameter "no" to "yes" (Figure 4).
After completing the above settings, the notebook will only connect to the specified hotspot, and after the hotspot list is expanded, it will no longer search for other hotspots and will naturally not connect to other hotspots, allowing the notebook to connect to the fastest hotspot. (Figure 5).
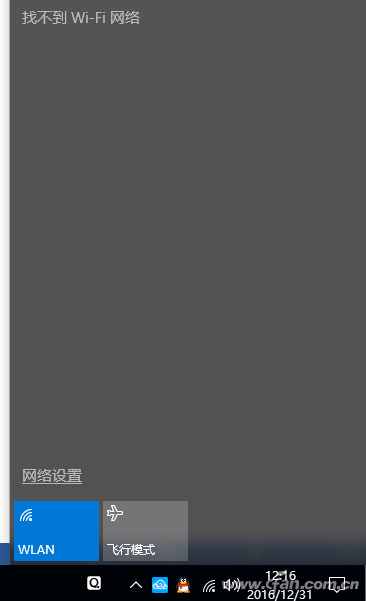
Figure 5 Automatic configuration of the wireless connection can no longer be searched for other hotspots
Of course, for users who support wireless/wired network adapters, if you use only one connection method (such as using only the Wi-Fi connection), the task bar will display a red cross icon with no wired connection. To avoid this situation, we can use the netsh command to quickly disable the network card at this time. Expand "Control Panel\Network and Internet\Network Connections" above, select the current wired connection, right click and select "Rename", change its connection name to "eth0", then use Notepad to enter the following code, and then save it as disable .bat is placed on the desktop for standby:
Netsh interface set interface eth0 disabled
Command explanation:
Here eth0 is the actual name of the connection that needs to be disabled. If you want to disable the wireless network card, change it to the wireless connection name yourself. If you want to re-enable it, change “disable†in the above code to “enableâ€.
In this way, when we only use the wireless connection method to access the Internet, we can quickly disable the wired network card by running the above batch processing to avoid the appearance of the Red Cross on the taskbar network card (Figure 6).
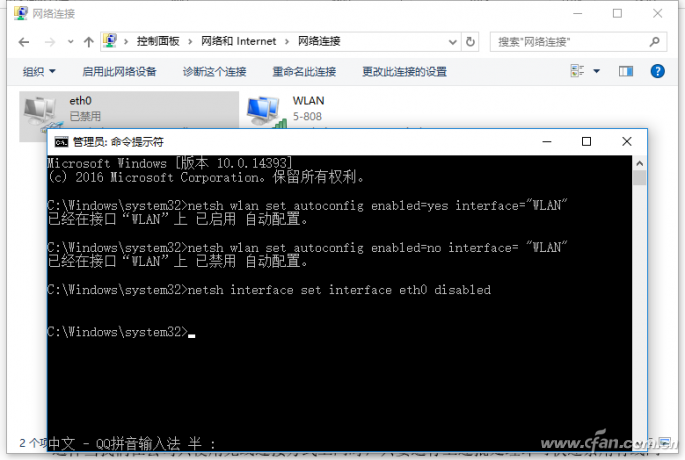
Figure 6 Quickly disable the network card using the command line
Connection configuration self definition
In order to facilitate quick access to the intranet IP address and use a custom DNS server for your notebook, many friends will use a custom method to fix their own laptop IP address and DNS server. However, due to the different home and company network environments, the network defined in the home is set to the company. There is no internet access. In order to facilitate quick switching of network settings in different network environments, we can implement switching by creating a batch process on its own.
Set the network parameters at home, confirm that you can successfully access the Internet and start the command prompt to enter "ipconfig /all", remember the current computer's Ipv4 address, subnet mask, default gateway, DNS server information (Figure 7).

Figure 7 Viewing Local IP Information
Start the notepad and enter the following code. Save it as “home.bat†and put it on the desktop for backup. The corresponding address information should be consistent with the information obtained from the above window:
Netsh interface ip set address "eth0" static 192.168.1.11 255.255.255.0 192.168.1.1
Netsh interface ip set dns "eth0" static 114.114.114.114
The above information is also remembered after the company is connected to the network, and a batch "work.bat" is created to be placed on the desktop. In this way, we can quickly switch to the corresponding network environment by using the administrator's identity to run the corresponding batch file at home or at the company, eliminating the need for manual setup (Figure 8).
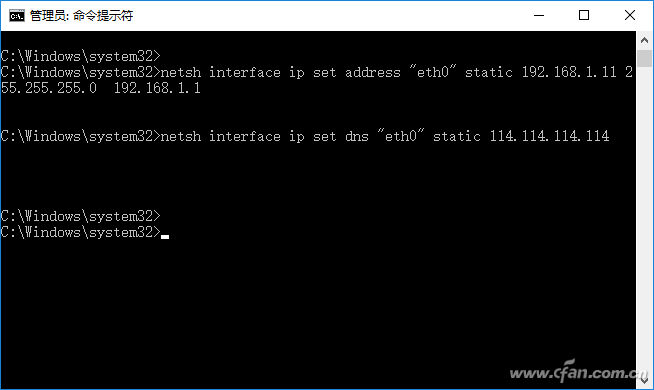
Figure 8 Using the command line to quickly switch network configurations
PC Cable:MINI DIN,D-SUB,SCSI.The display connecting line includes the data cable connecting the host computer and the display screen, and the power cable connecting the power supply.
The common data cable types are: HDMI cable, VGA cable and DVI cable. There is also a DP cable for notebook!
This product is suitable for computer and automatic connection cable with rated voltage of 500V and below. K type B low density polyethylene (LDPE) with oxidation resistance is used for insulation of cable ground wire core. Polyethylene has high insulation resistance, good voltage resistance, small dielectric coefficient and small influence of dielectric loss temperature and variable frequency. It can not only meet the requirements of transmission performance, but also ensure the service life of the cable. One
In order to reduce the mutual crosstalk and external interference between loops, the cable adopts shielding structure. According to different occasions, the shielding requirements of cables are as follows: the combined shielding of twisted pair, the total shielding of cable composed of twisted pair, and the total shielding after the combined shielding of twisted pair.
Shielding materials include round copper wire, copper strip and aluminum / plastic composite belt. Shielding pair and shielding pair have good insulation performance. If there is potential difference between shielding pair and shielding pair, the transmission quality of signal will not be affected.
PC Cable
ShenZhen Antenk Electronics Co,Ltd , https://www.antenkwire.com