First edit one of the simplest functions, including variable assignment and initialization: test1.c
1. #include
2.
3. void main()
4. {
5. int d = 4;
6. }
Then compile: arm-linux-gnueabihf-gcc test.c -o test1

Then look at the assembly code: arm-linux-gnueabihf-objdump -D test1; I have given a detailed comment on the meaning of each sentence.
First of all, the output file format description, for the following output, the left is the program address (various function addresses, etc.), the second column is the hexadecimal representation of the instruction code is also commonly known as machine code, the rest is for humans Instruction mnemonic, for example:
835c: b480 push {r7}
Here, 835c is the address of the main function, b480 is the instruction represented by the machine code, and push {r7} is for us to see. Let's look at the output of test1:
0000835c
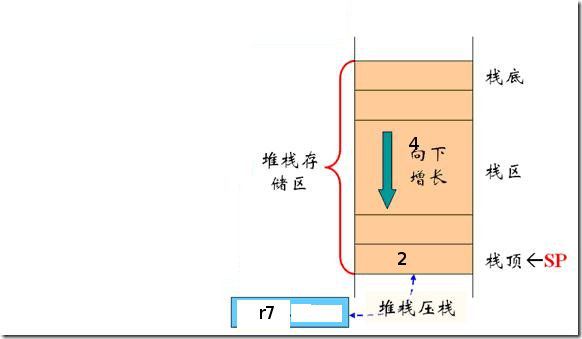
The program uses the r7 register, so it needs to be protected from breaking the previous data.
1 835c: b480 push {r7}
The stack grows down and the stack is not much, only 12 bytes is enough: int d needs 4, and the extra 8 are not used.
2 835e: b083 sub sp, #12
Because r0-r7 is a general-purpose register, it can be used hard. The stack register sp is only used when there is no way. Had to use r7 = sp + 0 this stupid way
3 8360: af00 add r7, sp, #0
Participating in the int d = 4 statement is r3, this is a general-purpose register, the spec definition can be used by everyone, no need to protect
4 8362: f04f 0304 mov.w r3, #4
Store 4 in the stack specified by sp+4, c language description: *(sp + 4) = 4; leave it to everyone to think: why not put it with sp--that is *(sp+0)=4?
5 8366: 607b str r3, [r7, #4]
Remember the second one: sub sp, #12? This sentence and the next sentence are to prepare to restore the original r7--pop {r7} from the stack;
6 8368: f107 070c add.w r7, r7, #12
R7 is already the original sp
7 836c: 46bd mov sp, r7
Pop up the memory data pointed to by sp to r7, c language: r7 = *sp;
8 836e: bc80 pop {r7}
The subfunction is not called, ie the lr register is not used, so push lr is not needed. Jump to the lr address-- enter the next address of the main function
9 8370: 4770 bx lr 10 8372: bf00 nop
Let's edit one more by adding a variable: test2.c
[cpp] view plain copy
1. #include
2.
3. void main()
4. {
5. int d = 4;
6. char b = 2;
7. }
0000835c
1 835c: b480 push {r7}2 835e: b083 sub sp, #123 8360: af00 add r7, sp, #0
4 8362: f04f 0304 mov.w r3, #4
Store 4 in the stack specified by sp+0, c language description: *(sp + 0) = 4, pay attention to the difference from the previous example, here is the top of the stack, why?
5 8366: 603b str r3, [r7, #0]
6 8368: f04f 0302 mov.w r3, #2
Why do you want to store the variable b so arbitrarily?
7 836c: 71fb strb r3, [r7, #7] 8 836e: f107 070c add.w r7, r7, #129 8372: 46bd mov sp, r710 8374: bc80 pop {r7}11 8376: 4770 bx lr
The data in the stack is like this, there are several streets separated by b and d :)
Magnetic Buzzer Self-drive Type
The magnetic buzzers (Self-drive Type) offer optimal
sound and performance for all types of audible alert and identification. Our
magnetic Buzzer solutions are offered with various mounting options. We also
provide you with a washable version for your preferred soldering method. Our magnetic buzzers, also known
as indicators, are designed with an internal drive circuit for easy application
integration. During operation, current is driven through a voice coil to
produce a magnetic field. When a voltage is applied, the coil generates a
magnetic field and then allows the diaphragm to vibrate and produce sound. This
buzzer type has a low operating voltage ranging from 1.5 – 12V+. Our magnetic
buzzers are desirable for applications requiring a lower sound pressure level
(SPL) and frequency.
Passive Buzzer,Dc Magnetic Buzzer,Electro Magnetic Buzzer,Magnetic Buzzer Self Drive Type
Jiangsu Huawha Electronices Co.,Ltd , https://www.hnbuzzer.com